Manual
How to use DiiPS software.
Table of Contents
Introduction
DiiPS (Digital Information of iPS Cells) is a software designed to help researchers identify disease-specific iPS cells (iPSCs) best suited to their research. Based on omics data, including data from micropatterned culture analysis, DiiPS visualize and compare the differentiation potential of iPS cells lines available from the Cell Bank of the RIKEN BioResource Research Center (RIKEN BRC).These insights support cell-line selection and experimental planning for disease modeling and regenerative medicine research.
How to use DiiPS
Home Page
Menu Header

-
"Home" takes you to the top page.
-
"About" provides detailed information about this software.
-
"Menu" opens the user manual (this page) for this software.
-
The banner links to the RIKEN BRC Cell Material Development Laboratory or RIKEN BRC.
-
You can switch between English and Japanese using the language selector button in the upper-right corner of the screen.
Analysis List

The visualization of iPSC pluripotency in the DiiPS software is based on the results of various experiments. On the top page, under “Analysis List”, you can select any of the experiments used for evaluation and navigate to the Cell Characteristics Screen.
Cell Characteristics Screen
The Cell Characteristics Screen consists of information on each iPS cell (table section: left) and a heatmap of modules calculated from omics analysis results (right). A module is a group of genes with similar expression patterns. This screen allows you to view the characteristics of each cell and differences in differentiation potential at a glance. Various filtering options are also available.

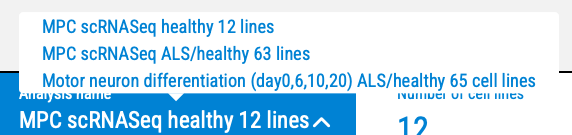
- Switching the displayed dataset (analysis) in the lower-left corner
A drop-down menu for switching analyses is located in the lower-left corner of the Cell Characteristics screen. Select the cell group and analysis you wish to view. Depending on the selected analysis, the modules, values, and legend displayed in the heatmap may change. After switching the display, check the legend at the bottom of the screen to confirm what the circle size and color represent.
- Understanding the cell information list
The list on the left displays basic information for each iPS cell line, including Cell ID, cell name, sex, cell information, and disease name. Each row in the list corresponds to the heatmap row displayed at the same height. When you scroll vertically through the list, the corresponding heatmap rows move in parallel and remain aligned with the same cells. Scroll as needed to view information that does not fit within the visible area.
- Opening the Detail Screen from a Cell ID
Click the ID text in the “Cell ID” column to open the Detail of a Cell Screen on the left. For detailed instructions, see the "Details of a Cell Screen" section below.


- Accessing the BRC Cell Catalog
Click the blue arrowhead icon next to the Cell ID to open the BRC Ccell Ccatalog in a new window and view detailed information about the cell.

- Filtering by Column
Clicking the funnel icon in each column to open a field for entering filter criteria. Enter text or a value to display only the cells that match the criteria in both the list and the heatmap.

When applying multiple filter criteria, use the AND/OR icon in the upper-right corner of the heatmap header to switch between AND and OR searches. Select AND to display only cells that meet all criteria. Select OR to display cells that meet at least one criterion.

- Understanding the heatmap
The heatmap displays cellular properties derived from omics analysis in units called “modules”. A module is a functional unit that groups genes that co-vary in expression or are involved in the same biological function. The module names defined for the analysis are shown as column headings. The types and number of modules vary by analysis. In the example below, cell characteristics are represented by six modules: Ectoderm, Emergent mesoderm, EPI, Nascent mesoderm, Amniotic, and Embryonic ectoderm. The horizontal dotted lines indicate the boundaries between cell clusters with similar characteristics. The areas separated by these lines can be used as a guide for identifying groups of cells with similar differentiation tendencies.

- Checking the metrics represented by circle size and color
The heatmap consists of a circle-based display on the left and an overview display on the right. The overview is always shown in full. The meaning of circle size and color vary by analysis. The legend at the bottom of the screen shows the metric names and value ranges used in the currently displayed analysis. The metric corresponding to circle size is shown on the left side of the legend, and the metric corresponding to color is shown on the right.
In the example below, circle size represents “Number of single cells,” and color represents “Expression rate.” Some analyses use only one display metric. In such cases, the circle size remains constant, and the legend displays only the metric represented by color.

- Filtering the heatmap by color range
In the heatmap, click the filter icon (funnel-shaped) for each module to specify a color range using the slider. Only cells with values within the selected range are displayed. Use this function to find cells with specific differentiation or expression tendencies.

- Other advanced settings
Click the gear icon at the far right of the heatmap header to show or hide columns and change the color scheme (color set). Select a color scheme that makes differences in values easier to distinguish according to how colors appear to you.

Details of a Cell Screen
Click the ID text in the “Cell ID” column to open the Detail of a Cell Screen on the left. This screen provides basic and related information for the selected cell, as well as a link to the RIKEN BRC Cell Bank.

Using the Detail of a Cell Screen
- Switching Between Cells Using Arrow Keys
While the Detail of a Cell Screen is open, you can switch between cells by pressing the Up or Down arrow key on your keyboard.
- Filtering cells by similarity
Adjust the Similarity slider to display only cells with similar differentiation characteristics in the heatmap. A lower Similarity value filters for cells with more similar differentiation properties. Click the Clear button to reset the filter.

Links to RIKEN BRC Cell Catalog
There are two links to the RIKEN BRC Cell Bank.
- Link on the Cell Characteristics Sscreen
In the list on the left side of the Cell Characteristics Screen, click the blue arrowhead icon next to a Cell ID to open the RIKEN BRC Cell Catalog in a new window. The linked page provides detailed information about the selected cell. Information regarding cell ordering and distribuiton is also provided.
- Link on the Detail of a Cell Screen
A link to the RIKEN BRC Cell Catalogue is also provided at the bottom of the Detail of a Cell Screen. Scroll to the bottom of the screen and click the “Cell Catalogue” button to open the detailed page for the selected cell. Information regarding cell ordering and distribuiton is also provided.
